OpenFeign启动流程(二):解析 Feign 注解与容器初始化
FeignClientFactoryBean 主流程
看完上一篇以后,我们已经知道所有的Feign客户端信息都挂载到FeignClientFactoryBean
由于我们使用了 FactoryBean 接口,因此feignClient客户端创建过程将通过 getObject 方法进行
@Override
public Object getObject() throws Exception {
//跳转到target
return getTarget();
}
/**
* @param <T> the target type of the Feign client
* @return a {@link Feign} client created with the specified data and the context
* information
*/
<T> T getTarget() {
//获取FeignContext容器
FeignContext context = this.applicationContext.getBean(FeignContext.class);
//1.加载builder
Feign.Builder builder = feign(context);
//判断是否存在url配置,因为如果存在url的话,�肯定是直接走url进行请求的
//反过来,如果不存在,则要进行负载均衡策略
if (!StringUtils.hasText(this.url)) {
if (!this.name.startsWith("http")) {
this.url = "http://" + this.name;
}
else {
this.url = this.name;
}
this.url += cleanPath();
//这里进行负载均衡,因为feign提供了ribbon模块
//在DefaultFeignLoadBalancedConfiguration 下进行注册的,也是feign的默认负载均衡策略
return (T) loadBalance(builder, context,
new HardCodedTarget<>(this.type, this.name, this.url));
}
if (StringUtils.hasText(this.url) && !this.url.startsWith("http")) {
this.url = "http://" + this.url;
}
String url = this.url + cleanPath();
Client client = getOptional(context, Client.class);
if (client != null) {
if (client instanceof LoadBalancerFeignClient) {
// not load balancing because we have a url,
// but ribbon is on the classpath, so unwrap
client = ((LoadBalancerFeignClient) client).getDelegate();
}
builder.client(client);
}
Targeter targeter = get(context, Targeter.class);
return (T) targeter.target(this, builder, context,
new HardCodedTarget<>(this.type, this.name, url));
}
主要流程包括以下三个关键步骤:
- 获取 FeignContext 容器:FeignClient 允许每个客户端具有独立的配置项,FeignContext 提供了这样的能力,通过它可以实现不同客户端之间的配置隔离。
- 判断是否存在 URL:在当前的 FeignClient 中,如果存在 url 配置,表示不需要走负载均衡,直接使用指定的 URL。
- 获取负载均衡器执行负载均衡策略:如果不存在明确的 url,则通过 loadBalance() 方法获取负载均衡器,执行负载均衡策略,选择合适的服务实例。
本章的重要,就是围绕这三个步骤进行讲解,其中,第一步是最重要的
1.FeignContext 容器
我们需要思考��一个问题,当出现多个FeignClient时,Feign是如何管理环境的?
FeignContext 这个类发挥着关键的作用,用于进行不同 FeignClient 之间的环境隔离和区分。
由此,我们重点看一下FeignContext内部是如何实现的
public class FeignContext extends NamedContextFactory<FeignClientSpecification> {

  public FeignContext() {
    super(FeignClientsConfiguration.class, "feign", "feign.client.name");
  }

}
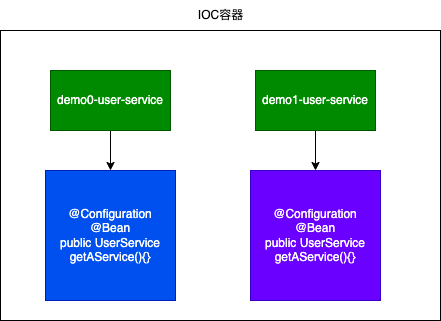
FeignContext 实现了 NamedContextFactory 接口。在这里,NamedContextFactory 的作用是创建一个子容器
NamedContextFactory具有一个重要的特性:它可以创建一个具有父子关系的容器。与我们通常将 Bean 统一放在 IOC 容器中不同,NamedContextFactory创建的子容器可以被视为重新开辟了一块容器区域。这个容器与父容器之间存在关联,拥有共同的父容器,并且可以从父容器中继承配置- 对于这些子容器来说,它们之间是相互隔离的。虽然它们共享相同的父容器,可以从中获取配置信息,但子容器之间的配置和 Bean 是相互独立的,互不影响
- 这种父子容器的设计模式使得在 OpenFeign 中可以灵活地管理和配置不同的 Feign 客户端,每个客户端都拥有自己的配置和上下文,而不会相互干扰
要弄清 NamedContextFactory,我们同样也需要了解 FeignClientSpecification 的作用
FeignClientSpecification可以理解为一个个容器,有多少FeignClient 就有多少子容器(父容器是@EnableFeignClients 下面会讲到)
在初始化流程中,FeignClientSpecification 在注册配置时被当成配置项进行了注册,但我们并没有详细介绍。因此,让我们再回顾一下 registerDefaultConfiguration,以下是相关代码:
  private void registerDefaultConfiguration(AnnotationMetadata metadata,
      BeanDefinitionRegistry registry) {
    Map<String, Object> defaultAttrs = metadata
        .getAnnotationAttributes(EnableFeignClients.class.getName(), true);

    if (defaultAttrs != null && defaultAttrs.containsKey("defaultConfiguration")) {
      String name;
      if (metadata.hasEnclosingClass()) {
        name = "default." + metadata.getEnclosingClassName();
      }
      else {
        name = "default." + metadata.getClassName();
      }
      registerClientConfiguration(registry, name,
          defaultAttrs.get("defaultConfiguration"));
    }
  }

  private void registerClientConfiguration(BeanDefinitionRegistry registry, Object name,
      Object configuration) {
    BeanDefinitionBuilder builder = BeanDefinitionBuilder
        .genericBeanDefinition(FeignClientSpecification.class);
    builder.addConstructorArgValue(name);
    builder.addConstructorArgValue(configuration);
    registry.registerBeanDefinition(
        name + "." + FeignClientSpecification.class.getSimpleName(),
        builder.getBeanDefinition());
  }
在 registerClientConfiguration 方法中,Feign注册了一个 FeignClientSpecification 对象。处理的是EnableFeignClients 注解。值得注意的是,这里生成的 name 是以 default.xxxx的形式命名的,这一点非常关键
此外,在后续的 registerFeignClients 中,同样也包含了 registerFeignClient 的逻辑。不过,这一步是对于每个 Feign 客户端的注册。与前面的注册相比,这里的注册是针对每个具体的客户端进行的。
  public void registerFeignClients(AnnotationMetadata metadata,
      BeanDefinitionRegistry registry) {
    //...
    for (String basePackage : basePackages) {
      Set<BeanDefinition> candidateComponents = scanner
          .findCandidateComponents(basePackage);
      for (BeanDefinition candidateComponent : candidateComponents) {
        if (candidateComponent instanceof AnnotatedBeanDefinition) {
          //...
          registerFeignClient(registry, annotationMetadata, attributes);
        }
      }
    }
  }
最后完整注册的列表如下图所示:
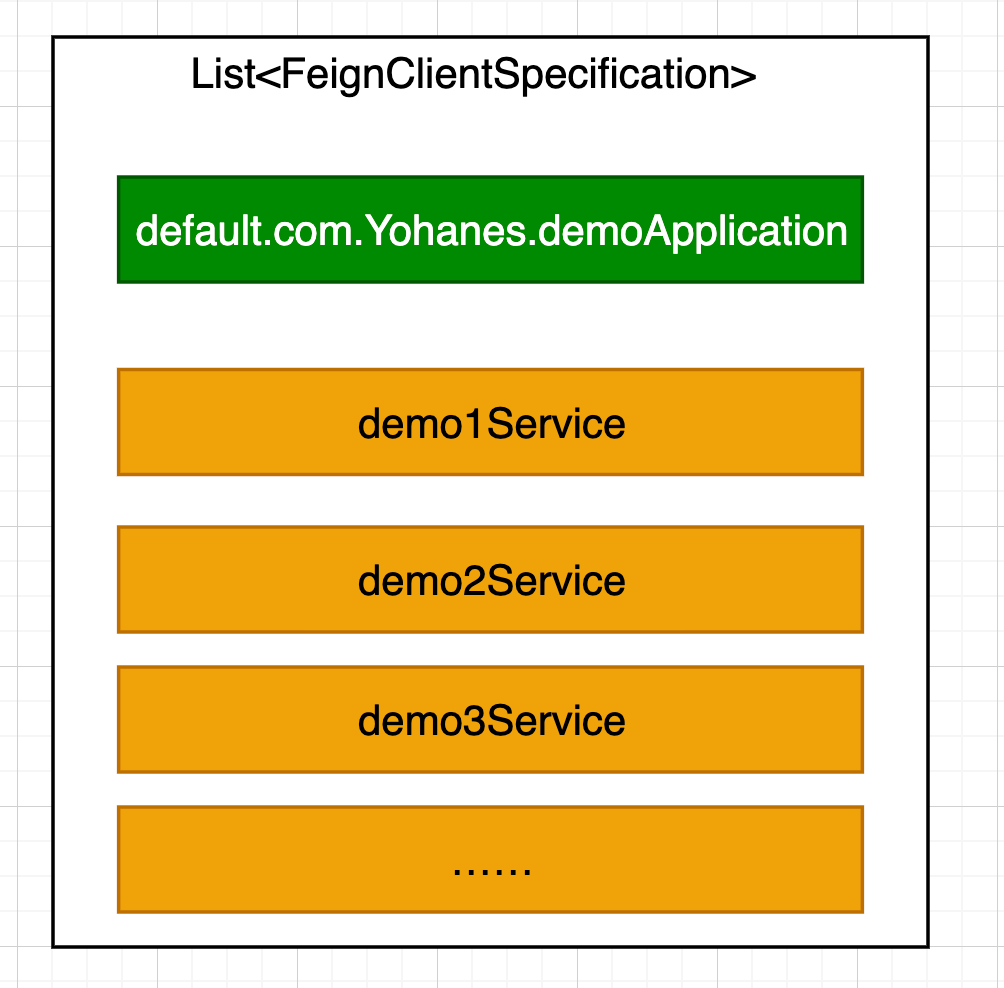
至此,FeignClientSpecification 已经完成了所有动作,我们回到Target代码中
    FeignContext context = this.applicationContext.getBean(FeignContext.class); ①
    Feign.Builder builder = feign(context); ②
① 从spring容器中获取FeignContext,FeignContext的自动装配在下面代码中,通过setConfigurations再将所有FeignClientSpecification 子容器set进去
@Configuration(proxyBeanMethods = false)
@ConditionalOnClass(Feign.class)
@EnableConfigurationProperties({ FeignClientProperties.class,
    FeignHttpClientProperties.class })
@Import(DefaultGzipDecoderConfiguration.class)
  public class FeignAutoConfiguration {

  @Autowired(required = false)
  private List<FeignClientSpecification> configurations = new ArrayList<>();

  @Bean
  public FeignContext feignContext() {
    FeignContext context = new FeignContext();
    context.setConfigurations(this.configurations);
    return context;
  }

  }
② feign方法内部做了一些初始化动作,通过context获取logger工厂,再通过logger工厂去创建logger
还包括编解码器、请求模版
  protected Feign.Builder feign(FeignContext context) {
    //从context容器里拿FeignLoggerFactory
    FeignLoggerFactory loggerFactory = get(context, FeignLoggerFactory.class);
    Logger logger = loggerFactory.create(this.type);

    // @formatter:off
    //构建Fieng.Builder 日志、编码器、解码器、请求构造
    Feign.Builder builder = get(context, Feign.Builder.class)
        // required values
        .logger(logger)
        .encoder(get(context, Encoder.class))
        .decoder(get(context, Decoder.class))
        .contract(get(context, Contract.class));
    // @formatter:on
    //根据配置类进行配置
    configureFeign(context, builder);

    return builder;
  }
再让我们看一下get内部发生的事,程序通过getInstance去容器中拿到具体的类
  protected <T> T get(FeignContext context, Class<T> type) {
    //从当前的FeignClientFactoryBean中根据contextId拿去唯一标识
    //忘了什么注册的也没关系哈,贴一下代码
    //在registerFeignClient的时候
    //String contextId = getContextId(attributes);
    //definition.addPropertyValue("contextId", contextId);
    T instance = context.getInstance(this.contextId, type);
    if (instance == null) {
      throw new IllegalStateException(
          "No bean found of type " + type + " for " + this.contextId);
    }
    return instance;
  }
我们需要再深入 NamedContextFactory 的 getInstance 方法,该方法用于获取或创建指定 contextId 的子容器。NamedContextFactory如何实现多个容器的逻辑与该方法离不开关系
  public <T> T getInstance(String name, Class<T> type) {
    AnnotationConfigApplicationContext context = getContext(name);
    if (BeanFactoryUtils.beanNamesForTypeIncludingAncestors(context,
        type).length > 0) {
      return context.getBean(type);
    }
    return null;
  }
往下看getContext
  protected AnnotationConfigApplicationContext getContext(String name) {
    if (!this.contexts.containsKey(name)) {
      synchronized (this.contexts) {
        if (!this.contexts.containsKey(name)) {
          this.contexts.put(name, createContext(name));
        }
      }
    }
    return this.contexts.get(name);
  }
contexts是一个Map的缓存池
private Map<String, AnnotationConfigApplicationContext> contexts = new ConcurrentHashMap<>();
「key→容器的名称」「 value →AnnotationConfigApplicationContext」
随后,我们在看createContext() 方法
  protected AnnotationConfigApplicationContext createContext(String name) {
    //创建一个新context
    AnnotationConfigApplicationContext context = new AnnotationConfigApplicationContext();
    if (this.configurations.containsKey(name)) {
      for (Class<?> configuration : this.configurations.get(name)
          .getConfiguration()) {
        context.register(configuration);
      }
    }
    for (Map.Entry<String, C> entry : this.configurations.entrySet()) {
      if (entry.getKey().startsWith("default.")) {
        //包含default 表示为父容器,也就是@EnableFeignClient中的配置项,这里所有子容器都会注册这些配置项
        //父子容器的逻辑也就是通过这里去实现的
        for (Class<?> configuration : entry.getValue().getConfiguration()) {
          context.register(configuration);
        }
      }
    }
    context.register(PropertyPlaceholderAutoConfiguration.class,
        this.defaultConfigType);
    context.getEnvironment().getPropertySources().addFirst(new MapPropertySource(
        this.propertySourceName,
        Collections.<String, Object>singletonMap(this.propertyName, name)));
    //又因为NamedContextFactory实现了ApplicationContextAware
    //所以private ApplicationContext parent; 有一个setAppplicationContext
    //将新创建的context的parent设置为当前的context 也就完成了父子容器关联
    if (this.parent != null) {
      // Uses Environment from parent as well as beans
      context.setParent(this.parent);
      // jdk11 issue
      // https://github.com/spring-cloud/spring-cloud-netflix/issues/3101
      context.setClassLoader(this.parent.getClassLoader());
    }
    context.setDisplayName(generateDisplayName(name));
    context.refresh();
    return context;
  }
到此为止,我们已经明白了整个父子容器的实现过程
2.url判断,负载均衡器
    if (!StringUtils.hasText(this.url)) {
      if (!this.name.startsWith("http")) {
        this.url = "http://" + this.name;
      }
      else {
        this.url = this.name;
      }
      this.url += cleanPath();
      return (T) loadBalance(builder, context,
          new HardCodedTarget<>(this.type, this.name, this.url));
    }
    if (StringUtils.hasText(this.url) && !this.url.startsWith("http")) {
      this.url = "http://" + this.url;
    }
如果不存在就会通过loadBalance()进行调用
protected <T> T loadBalance(Feign.Builder builder, FeignContext context,
      HardCodedTarget<T> target) {
      //获取到client 也是就试着读取一下,在当前环境下有没有自定义的Client策略,如果没有的话,还是会走
      //LoadBalancerFeignClient
    Client client = getOptional(context, Client.class);
    if (client != null) {
      builder.client(client);
      //这里会走HystrixTargeter
      //他被放在了DefaultFeignTargeterConfiguration进行配置,如果不存在
      //如果不存在feign.hystrix.HystrixFeign 模块,也是你只引入了core,而没有引入了openFeign的完整包
      //那么在这里就会执行DefaultTargeter 反之,如果你引入了openFeign的包,他就会走HystrixTargeter
      Targeter targeter = get(context, Targeter.class);
      return targeter.target(this, builder, context, target);
    }
最后target会走实�例化加载
public <T> T target(Target<T> target) {
  //synchronousMethodHandlerFactory build中会构造这个工厂,最后使用的invoke反射会用到这个
  //SynchronousMethodHandler
  return build().newInstance(target);

}
public <T> T newInstance(Target<T> target) {
    // 创建一个 Map,将方法名映射到 MethodHandler,MethodHandler 是用来处理具体方法调用的
    Map<String, MethodHandler> nameToHandler = targetToHandlersByName.apply(target);

    // 创建一个 Map,将方法映射到 MethodHandler
    Map<Method, MethodHandler> methodToHandler = new LinkedHashMap<Method, MethodHandler>();

    // 创建一个列表,用于存储默认方法的处理器
    List<DefaultMethodHandler> defaultMethodHandlers = new LinkedList<DefaultMethodHandler>();

    // 遍历目标接口中的所有方法
    for (Method method : target.type().getMethods()) {
        if (method.getDeclaringClass() == Object.class) {
            // 如果方法是 Object 类中的方法,跳过
            continue;
        } else if (Util.isDefault(method)) {
            // 如果方法是默认方法,创建 DefaultMethodHandler 并将其添加到列表中
            DefaultMethodHandler handler = new DefaultMethodHandler(method);
            defaultMethodHandlers.add(handler);
            methodToHandler.put(method, handler);
        } else {
            // 否则,将方法与其对应的 MethodHandler 映射关系存储到 methodToHandler 中
            methodToHandler.put(method, nameToHandler.get(Feign.configKey(target.type(), method)));
        }
    }

    // 创建一个 InvocationHandler,它用于处理代理对象上的方法调用 也就是FeignInvocationHandler
    InvocationHandler handler = factory.create(target, methodToHandler);

    // 创建代理对象,代理类型是目标接口的类型
    T proxy = (T) Proxy.newProxyInstance(target.type().getClassLoader(),
        new Class<?>[] { target.type() }, handler);

    // 将代理对象与默认方法处理器进行绑定
    for (DefaultMethodHandler defaultMethodHandler : defaultMethodHandlers) {
        defaultMethodHandler.bindTo(proxy);
    }

    // 返回创建的代理对象
    return proxy;
}
到这里就完整了整个Bean的初始化加载,通过JDK代理进行类的初始化,这里代理也是为了进行实现通信相关的逻辑,最后在真正调用的时候,会去调用FeignInvocationHandler的invoke方法,下一篇执行流程,我们就会围绕着invoke的方法作为入口进行讲解